How to install a TEST printer driver
Why am I here?
You've probably arrived here because someone on a PowerPoint help forum or newsgroup sent you the link.
And you're probably wondering what a printer driver has to do with the problem you're trying to solve. Maybe you're even wondering whether the person who sent you here even paid attention to your question.
Bear with us. They had a very good reason for sending you here. Following the advice here can help correct all manner of odd problems with PowerPoint.
Printer driver? You've got to be kidding!
No joke. PowerPoint relies heavily on the default printer driver installed on your PC. It shouldn't, but it does.
If you want PowerPoint to work reliably, you need:
- A compatible printer driver
- The driver must be installed locally, not on a network (though the printer itself may be on a network)
- The driver must be set as your default printer driver
If you don't meet those three requirements, PowerPoint can exhibit a wide variety of problems including
- Crashes
- Slow text editing
- Badly spaced or cut-off characters
- Pages that print partially or not at all
In fact, printer driver problems can cause so many bizarre problems that we recommend following the steps below as a general troubleshooting procedure whenever PowerPoint misbehaves. It only takes a few minutes and makes no permanent changes to your PC.
And remember: It's just a test. You needn't use the driver to print anything. You don't need the actual printer, just the driver. And once you're done with the test, you can delete the driver if you like (though we'd suggest leaving it installed for future tests, rather than having to re-install the driver if you need it again.)
Please follow these instructions below exactly. If you skip steps, choose a different driver or use a different method of installing the driver, the test won't be valid.
Install a TEST printer driver
The steps may vary and the screens will look different depending on the version of Windows you have. The general procedure is the same, though.
- Quit PowerPoint if it's already running.
- Click Start, Settings, Control Panel.
- Double-click "Printers & Faxes"
- Double-click "Add Printer" to start the Add Printer Wizard
In Vista:
- Quit PowerPoint if it's already running.
- Click Start button, Control Panel.
- Click "Classic View".
- Double-click "Printers".
- Click "Add a printer" in the menu bar to start the Add Printer Wizard
- In the first step of the wizard, click "Add a local printer".

The Add Printer Wizard Welcome screen
- Click Next

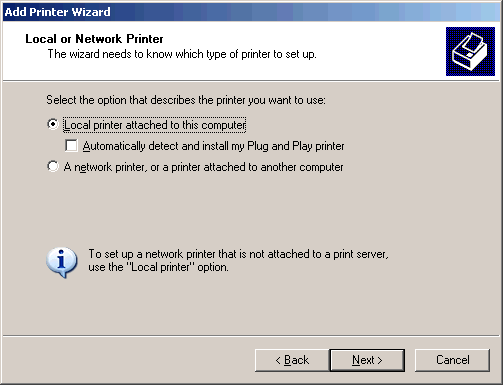
Local or Network Printer
- Click "Local Printer"
- Make sure there's NO checkmark next to "Automatically detect and install ..."
- Click Next

Select a Printer Port
- Since you're installing this driver only as a test, choose LPT1: or FILE: (it doesn't really matter, since you'll never actually print to the port)
- Click Next

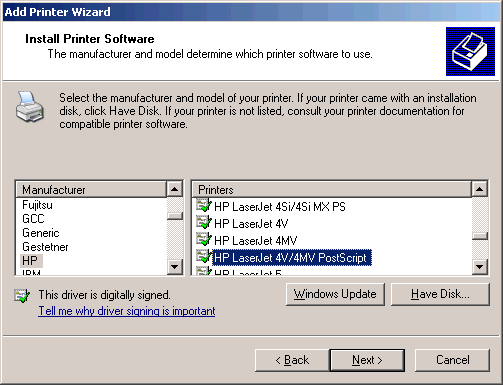
Install Printer Software
- Choose the HP LaserJet 4V/4MV as we've done here. If you use Windows VISTA, it may be way at the bottom of the listing of HP LaserJet 4 drivers. If you don't find this particular driver, choose any LaserJet driver with "PostScript" or "PS" in its name.
- Click Next

Name Your Printer
- Give the printer a name (this is the name you'll use to select it later)
- Since you're installing the driver as a test, you might want to give it a name that indicates it isn't a real physical printer (PPT Pacifier, or the like)
- Click "Yes" under "Do you want to use this printer as the default printer" (this option may not appear in all Windows versions; see Notes below)
- Click Next

Printer Sharing
- Click "Do not share this printer"
- Click Next

Print Test Page
- Click No
- Click Next

Completing the Add Printer Wizard
- Review your choices. Click Back if you need to change anything
- Click Finish
If you don't see "Use this printer as the default printer" in the "Name printer" screen, finish installing the printer, then click Start, Settings, Printers; rightclick the printer you just installed and click "Set as default printer" from the pop-up menu that appears.
Test and evaluate the results
Once you've installed the printer driver and set it as your default printer, start PowerPoint again and test to see if the previous problems still occur.
If the problems have not gone away, it means that your original printer driver and setup were not at fault. You can delete the test printer driver if you like.
If the problems no longer occur, it means that there was a problem with your previous printer driver or with the way it was installed. To pursue the issue further:
- Make sure that the original printer driver was installed on your computer, not on a network server. The printer itself can be on the network, so long as the driver is locally installed. See How to install a local printer driver to learn more.
- Check the printer manufacturer's web site for updated drivers